Saturday 29 September 2012

Unfinished prop: Aperture Science Handheld Portal Device

Not a big post, this one, but after three days of on and off work I felt like just posting something. So here it is!


Ta-da!
It doesn't look like a massive leap, but the amount of work that's gone into this shell at this point has been pretty intense. Once the shell had totally dried I gave the exterior a coating of joint compound (polyfiller)  to fill in all the deep recesses and started sanding. Once I'd sanded it, I filled in all the extra areas with more filler and I've essentially had to repeat this process about 10 times in order to get what you see before you. The exterior edges are still a big rough as they were extremely inconsistent so I've had to add a lot of filler to even them out. For the sanding I've been starting off with 50 grit sandpaper, sanding down all the really obvious lumps and bumps, moving to 80 to do finer work and then finishing it up with 120 grit. In places it's perfectly smooth, but due to my erratic texture that I left when I coated the shell with clay intially, it's rather lumpy in places.

Still, this gun was never going to be amazing, so I'll let myself off (although it's something to keep in mind). You can also still see that the inside looks like the bottom of f batcave, but I'm not sure I'll have the time to sand the whole thing smooth so there's some planning ahead to do on how to fudge that. I'm hoping I can cover up the majority of the inside of the shell with the gun barrel. I'm also thinking that; considering how well the exterior layer alone held the shape, I may only do an exterior layer on the rear shell in order to cut down on the workload as it'll be supported by the gun barrel and handle anyway.

So! What have we learned?
  1. Sanding's hard and although the name of the activity suggests otherwise, it's not all about the sanding. I was surprised to discover that it's as much filling in gaps and building edges up with extra material as it is about wearing material away. If you were to just sand you'd never get anything smooth.
  2. Not to coat the inside of the next shell with clay. Also, to try to finish the initial layer of paperclay on the outside so that it's much smoother than this one was. To save on both sanding and the amount of filler used.

Monday 24 September 2012

Unfinished prop: Aperture Science Handheld Portal Device

Materials: LD45 Foam
                 Homemade Paperclay
                 Hot Glue
                 Polyfiller ( Joint Compoud )

Time taken: Two days ( so far )

Safe to say, that this is going to be the most ambitious project of mine yet. The complicated nature of the gun itself, coupled with the mixed material approach I'm using are doubtlessly going to result in hilarity ( read: my tears of frustration ) at some stage as I'm yet to really combine any radically different materials. I'm actually making this gun for a friend of mine with a deadline of the 28th October, so the pressure's really on.

The first part of this I've decided to work on is the front most 'shell' of the gun, where the user's hand rests underneath the end of the barrel. The gun's shells are where I forsee all the major complications for this project arising as they're quite complicated 3D curves and are going to need to be 'solid' to match the in game gun's metal / fibreglass effect.


So, to work! In the interests of saving time and money I've forgone the whole sculpt, vacuform, cut method ( Which, personally, I would love to be doing, in a perfect world ) and instead I'm going to mash up some pepakura with some paperclay. The first step was to get ahold of a .pdo file of the portal gun which was kindly supplied by a user over at the Replica Prop Forum.


For those not in the know, Pepakura is a piece of software that takes 3D models and 'unfolds' them into parts that can be printed off, cut out and reassembled. It's the software of choice for most people into their papercraft and the concept can be conviniently be transferred over to prop making by cutting the pieces out in foam rather than paper. Due to the ( relatively ) simple nature of the gun's barrel, I've opted to just use Pepakura for the shells.


 So after printing off the pieces, I cut them out, ignoring the fastening triangles as they're not necessary when working with foam.


Once that was done, I lay the pieces down on foam that I'd already covered with PVA glue, I then covered the top with PVA in order to ensure that it was stuck fast. I repeated this process for the other half of the shell and left the whole thing in an airing cupboard to dry.


Once dried it was simple enough to cut the foam out to match the paper laid on top of it. When it was cut to match I could easily peel the paper off. Once the whole thing was cut out I hot-glued the whole thing together. Unfortunately I'm missing a picture of how the shell looks at this stage, but I'm sure you can imagine.


Since the shells are rigid, the next part of the process involved the use of paperclay. Although choices for this like fibreglass or Jesmonite ( A UK produced, non toxic alternative) exist, I went with paper clay. A relatively lightweight and surprisingly sturdy alternative for making solid props. The upside is that paper clay can be made at home with relatively inexpensive ingredients. (As seen here) Having made a batch, I coated the exterior of the shell with it, using a two liter bottle to help keep the shell's form and left it to set for 24 hours in an airing cupboard.


Once paper clay dries out it goes almost rock solid and the shape is set, as seen below.


With the exterior done, I also coated the shell's interior, leaving that to set for a further 12 hours.


Once the whole thing had dried out, I coated the exterior with a layer of polyfiller in order to fill in all the small dips and cracks to make sanding the whole thing down a simpler process, I then left the shell to dry again.

SO, what did we learn?

  1. Follow the recipe. What you're seeing above is the succesful batch of paperclay. I actually repeated this whole process for the larger rear shell, but where the recipe for paperclay is proportional ( being a UK resident the term 'cup' for me actually resulted in my use of a cup to measure quantities) I figured I could just double all the quantities, so where I'd used one roll of toilet paper before, I then used two. Turns out not all toilet rolls were made equal and that the two I used the second time around yielded a lot more paper than the first I had used, resulting in a soft, extremely mallable when dry, high paper content clay that I could simply peel off the shell whereas the first batch stuck tight to the foam immediately.
  2. Remain consistent with ingredients. Toilet roll is the obvious one, but in the second batch I also used standard polyfiller as apposed to the fine cracks variety that I'd used previously. Despite using four times what I had the first time around to try to offset the paper, standard polyfiller doesn't adhere as wel, nor set as rigid as the fineline crack variety.
The next stage is going to be a hopefully more succesful attempt to coat the rear shell in a better batch of paperclay. Whilst that's drying I'll also take a stab at sanding the first shell to a smooth finish. Although I could start constructing the barrel now, I'd rather wait until both shells are done as they're the most distinctive part of the gun and the other components revolve around them.

Friday 21 September 2012

Finished prop: Zaku Heat Hawk on the cheap

Materials: Cardboard
                 Cardboard inner tubes
                 Masking tape
                 PVA glue
                 Hot glue
                 Plastidip Aerosol Spray

                 Green & Silver Spray paint
                 Permanent Marker

Time taken: One Week

So due to a chronically unreliable printer, the beam spray gun project was canned as I couldn't print off the E-cap (although I did have a brief foray into Blender to make the part, which may come in useful in future). Because of this, I was left a bit high and dry for things to do. Thankfully, some cardboard inner tubes were left hanging around and I figured since I'd scrapped one Gundam project I may as well move on to another. Since I'd been using up a lot of foam in the past two efforts I wanted to have a shot at doing something on the cheap, this Heat Hawk is the result.

The process: 

So, first up I took the cardboard tubes and cut them up, to create the angled part in the axe I cut the connecting section at a 45 degree angle. It was a surprisingly weird line to draw, so I had to first roll a tube out of paper and cut it to the right shape, then lay it over the tube and cut it to match.


The next stage was pretty simple, just glue the whole thing together, making sure the parts all lined up.


Throughout this process I was measuring everything to make sure every part was in proportion to some concept art I'd found online. After sticking the tubing together I drew the main blade of the axe out on some cardboard. and then cut it out and used it as a template to cut out another blade.


Once I'd cut out the blades, I stuck them together, then using PVA I pinched the edges together in order to create and actual 'blade'.


In order to cover up the corrogated edges of the cardboard, as well as the rough edges of the 'blade'. I'd seen this technique used in a tutorial on cardboard weapons and the writer swore by it. However I found that masking tape tends to peel away extremely easily ( which, when you think about it, is a good property for masking tape ). I used the tutorial writer's technique of sticking it down with PVA, but the glue didn't penatrate the tape well at all (again, a good property for masking tape). After a lot of PVA the tape did stick, but it took an awful lot.


Next up, I cut these two pieces of cardboard and stuck them to the top of the handle. These pieces would hold the blade away from the main tube.


Added a bit of hot glue and let it set.


After that, I cut out two more pieces of cardboard to fit along the tube and around the rear edges of the blades in order to cover up the empty space.


After sticking masking tape along the joined edges I used a little bit of left over foam ( I know, I didn't list it. It could have just have easily been cardboard, but for the sake of comfort I went for foam).


Next up, is the piping, it starts off with a hexagonal part at the top of the main tube, simple enough.


To make the tubing I cut a question mark shape out of a flat piece of cardboard and then wrapped lengths of cardboard into circles around it, spacing them relatively equally. They were stuck in place with got glue with masking tape along the seams.


Using thinner card (think cereal box thickness) I cut out circles with a slit missing to act as the tops and bottoms for the cylinders along the rear piping. All the seams were covered up with masking tape. I attached this to a piece of cardboard that was simply glued to the top of the main handle. I made the spike at the bottom of the handle with a tube of cardboard and a cone made from thin card.


I proceeded to cover the whole thing with plastidip to seal it against moisture. Annoyingly, somewhere along the way the top part of the axe became too heavy for the joint and the top came away from the bottom. The white you can see in this picture is from some hasty hotglueing.


To get around this, I made this support brace to hold everything together. I hotglued it to the main tubing and covered it with more plastidip.


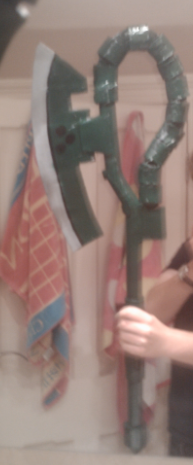
Here's the whole thing at this point. As you can see, this axe is huge, so whilst it was entirely in proportion with itself, it's much larger in relation to me than a heat hawk should be to a Zaku II.


The final step was painting the whole thing green. I followed the green paint up by masking off an area with masking tape and painting it grey. Once both sides had been done, I added detail on with permanent marker. This also served to cover up the misty transition between the grey and green.


So there we have it! The finish wasn't so great, but to the undiscerning eye, this thing actually looks halfway alright.

SO, what did we learn?

  1. Masking tape isn't great for covering edges. As I've pointed out, it peels away very easily and is very, very good at letting moisture through, all the properties you'd want ffrom it. Of course, this makes it terrible for the purpose I put it to in this project. Maybe the tutorial writer used sub par tape? We'll never know.
  2. I should have used foam for the tubes on the piping, corrugated cardboard doesn't roll into a perfect curve edged.
  3. The spray paint I use has a very glossy finish, which doesn't lend to the dull metallic kind of finish the axe is supposed to have. As you can see from the pictures, it's very reflective. I'm considering a clear matte finish spray, but the tins that it comes in are quite small, so it'd be pretty costly.
  4. If I'm making a prop, make sure it's in proportion to me as well as itself. I did this with the beam gun, so perhaps next time drawing the whole thing up ahead of time.
So I'm pretty happy with it, it's surprisingly solid, the bladed edge is pretty painful if someone whacks you with it and it makes a very smooth swoosh when you swing it around. Considering this whole thing cost me nothing at all as I already had everything, I can't complain.