Showing posts with label Plastidip. Show all posts

Friday, 21 September 2012

Finished prop: Zaku Heat Hawk on the cheap

Materials: Cardboard
                 Cardboard inner tubes
                 Masking tape
                 PVA glue
                 Hot glue
                 Plastidip Aerosol Spray

                 Green & Silver Spray paint
                 Permanent Marker

Time taken: One Week

So due to a chronically unreliable printer, the beam spray gun project was canned as I couldn't print off the E-cap (although I did have a brief foray into Blender to make the part, which may come in useful in future). Because of this, I was left a bit high and dry for things to do. Thankfully, some cardboard inner tubes were left hanging around and I figured since I'd scrapped one Gundam project I may as well move on to another. Since I'd been using up a lot of foam in the past two efforts I wanted to have a shot at doing something on the cheap, this Heat Hawk is the result.

The process: 

So, first up I took the cardboard tubes and cut them up, to create the angled part in the axe I cut the connecting section at a 45 degree angle. It was a surprisingly weird line to draw, so I had to first roll a tube out of paper and cut it to the right shape, then lay it over the tube and cut it to match.


The next stage was pretty simple, just glue the whole thing together, making sure the parts all lined up.


Throughout this process I was measuring everything to make sure every part was in proportion to some concept art I'd found online. After sticking the tubing together I drew the main blade of the axe out on some cardboard. and then cut it out and used it as a template to cut out another blade.


Once I'd cut out the blades, I stuck them together, then using PVA I pinched the edges together in order to create and actual 'blade'.


In order to cover up the corrogated edges of the cardboard, as well as the rough edges of the 'blade'. I'd seen this technique used in a tutorial on cardboard weapons and the writer swore by it. However I found that masking tape tends to peel away extremely easily ( which, when you think about it, is a good property for masking tape ). I used the tutorial writer's technique of sticking it down with PVA, but the glue didn't penatrate the tape well at all (again, a good property for masking tape). After a lot of PVA the tape did stick, but it took an awful lot.


Next up, I cut these two pieces of cardboard and stuck them to the top of the handle. These pieces would hold the blade away from the main tube.


Added a bit of hot glue and let it set.


After that, I cut out two more pieces of cardboard to fit along the tube and around the rear edges of the blades in order to cover up the empty space.


After sticking masking tape along the joined edges I used a little bit of left over foam ( I know, I didn't list it. It could have just have easily been cardboard, but for the sake of comfort I went for foam).


Next up, is the piping, it starts off with a hexagonal part at the top of the main tube, simple enough.


To make the tubing I cut a question mark shape out of a flat piece of cardboard and then wrapped lengths of cardboard into circles around it, spacing them relatively equally. They were stuck in place with got glue with masking tape along the seams.


Using thinner card (think cereal box thickness) I cut out circles with a slit missing to act as the tops and bottoms for the cylinders along the rear piping. All the seams were covered up with masking tape. I attached this to a piece of cardboard that was simply glued to the top of the main handle. I made the spike at the bottom of the handle with a tube of cardboard and a cone made from thin card.


I proceeded to cover the whole thing with plastidip to seal it against moisture. Annoyingly, somewhere along the way the top part of the axe became too heavy for the joint and the top came away from the bottom. The white you can see in this picture is from some hasty hotglueing.


To get around this, I made this support brace to hold everything together. I hotglued it to the main tubing and covered it with more plastidip.


Here's the whole thing at this point. As you can see, this axe is huge, so whilst it was entirely in proportion with itself, it's much larger in relation to me than a heat hawk should be to a Zaku II.


The final step was painting the whole thing green. I followed the green paint up by masking off an area with masking tape and painting it grey. Once both sides had been done, I added detail on with permanent marker. This also served to cover up the misty transition between the grey and green.

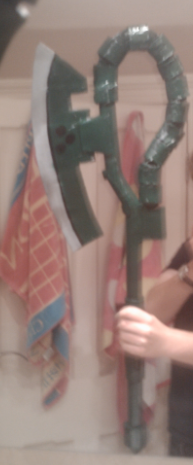

So there we have it! The finish wasn't so great, but to the undiscerning eye, this thing actually looks halfway alright.

SO, what did we learn?

  1. Masking tape isn't great for covering edges. As I've pointed out, it peels away very easily and is very, very good at letting moisture through, all the properties you'd want ffrom it. Of course, this makes it terrible for the purpose I put it to in this project. Maybe the tutorial writer used sub par tape? We'll never know.
  2. I should have used foam for the tubes on the piping, corrugated cardboard doesn't roll into a perfect curve edged.
  3. The spray paint I use has a very glossy finish, which doesn't lend to the dull metallic kind of finish the axe is supposed to have. As you can see from the pictures, it's very reflective. I'm considering a clear matte finish spray, but the tins that it comes in are quite small, so it'd be pretty costly.
  4. If I'm making a prop, make sure it's in proportion to me as well as itself. I did this with the beam gun, so perhaps next time drawing the whole thing up ahead of time.
So I'm pretty happy with it, it's surprisingly solid, the bladed edge is pretty painful if someone whacks you with it and it makes a very smooth swoosh when you swing it around. Considering this whole thing cost me nothing at all as I already had everything, I can't complain.

Saturday, 28 July 2012

Unfinished prop: GM's beam spray gun

Materials:     Cardboard,
                      LD45 Plastazote foam
                      Hot glue

Time taken:  One day

So, moving away from the costume like nature of the automail arm towards props I decided to take a stab at the Beam Spray Gun from the original Mobile Suit Gundam. I've always fancied doing a full sized RX-78 Beam Rifle from the show, but due to its relatively large size and complexity I figured the humble Beam Spray Gun would be a better starting point, allowing me to get my bearings on making guns with plastazote.

The Process

So the first step was to draw up a 2D 'to scale' version in cardboard, I started by drawing a handle that'd work for my hand size and then drew everything else to scale in relation to that to ensure that the whole thing didn't look to.disproportionate.


After that using an image on my laptop I made sure that everything was as close to scale as I could make it, I made sure to straighten out all the lines and ensured consistant angles.


Once that was all done, I set to work cutting it out with a craft knife.


Then from this main template I set about cutting out reproductions of the centre bit. To get a proper thickness to the gun I needed to use multiple layers of Plastazote foam, I didn't cut out the 'cap' on the end or the gun's barrel as they're both hollow cone shapes and these kind of shapes can't be produced well with simple layers. I then stuck them together, two on each side of a cardboard reproduction of the first for the sake of rigidity.


This was where the first problem came in. because I was cutting around the cardboard to get my foam layers one layer at a time the layers were not identical and there were minor variations in each one. Towards the end of things I sanded these down with a dremmel, but it's almost impossible to get a consistent flat edge with four layers of foam and cardboard.

The next stage was to cut out foam to serve as the gun's main body. Although I have a 'flat' version of the gun, the actual design has it based around a cylinder. I worked the radius of the cylinder from the original cardboard's measurements and cut two pieces of foam to serve as a base for this, followed by two more which had slits cut in to reproduce 'vents' look.


Obviously the next stage was sticking these on.


At which stage another problem presents itself: One of Plastazote's attributes is that it can be thermoformed, to a degree, but this cam back around to bite me when trying to glue the body sides down. Once I'd applied the hot-glue the edges of the foam warped, leaving me with edges that are either at uneven angles to everything else or slightly indented.


Following that came the slightly smaller section of the body, this had slits cut in much like the previous bits. Similar problems were encountered as well and one mistake on my part was that as I glued one side on, it stretched slightly, leaving the slits at an angle instead of purely vertical.


Following that I made a conical tube from the foam and put a base and a lid on, attaching them to a small tube added to the back to serve as the Beam Spray Gun's E-cap. The biggest issue here is that if there is math to make a perfect cone, I don't know it. As a result my 'cap' is wonky and when stuck on throws off the shape of the gun, giving it a bent look.


A problem further compounded by the main barrel. Once again, conical tubes are hard to make from scratch and as I hadn't thermoformed the gunbarrel when I cut the slits out of the side it refused to hold its shape and splayed outwards. At this point both the E-cap and the gunbarrel point slightly downward, giving the whole thing an even worse 'bent' look.

SO. What have we all learned so far?

  1. Don't underestimate the heat given off by hot glue when initially applied, or how easily thin plastazote warps when heated. perhaps a better way would have been to cut slits in the early foam 'slices' to feed a cylinder to serve as the body in to in order to ensure straight edges, adding the detailed layers later.
  2. Angles are important, the skewed vent lines throw the whole thing off on the gun's body, next time, I'll take the utmost care when applying the detail layers in order to ensure that things point where they're supposed to.
  3. Cones are hard and I don't think hand drawing is the way to go to make templates. I'm considering picking up a basic 3D modelling program in order to create shapes to export to a program like pepakura to allow me to create gemoetrically perfect foam pieces.
Since I took those photos I've removed the E-cap and the barrel and I'm looking at 3D modelling software. The plan is to make both pieces using the pepakura method and this time using thermoforming on the barrel to ensure it holds its shape better. Plastidip coating would also seem to be the next phase, but I've left myself a problem where the edges where the five layers come together that runs along the length of the gun are highly visible, especially the cardboard. Masking these before coating would provide a much better overall finish.

Until next time!

Wednesday, 25 July 2012

Cosplay: Full Metal Alchemist, Edward Elric's automail

Materials:     LD45 2mm plastazote foam
                      Hot glue
                      PVA glue
                      Plastidip Aerosol Spray
                      Silver Spray paint

Time taken:  One week

A bit light on pictures, this one, but that's mainly because I cranked it out in a fervour with no thoughts to documenting the process. Not too much of a problem as the process was relatively simple, but it might have given some insight for next time.

Anyway.


I decided to go with the Automail arm as a mean's to test and get to grips with the LD45 Plastazote foam since I'd already made an arm before ( in cardboard and Jesmonite, if you must know. An interesting combination with interesting results ) and with the wealth of tutorials out there to help it seemed like a safe bet that I'd be able to at least produce something.

The process was a relatively simple one, pulled mainly from the previously linked Amethyst Angel guide but with a spot of visual assistance from the Featherlight take. By creating paper templates first from newspaper, then cardstock, I was able to come up with the templates to make the parts to fit me personally.

Once I'd made these templates, the next stage was to use the templates to cut the individual pieces from foam which were then stuck together.with seam lines placed either in areas facing the body ( such as on the bicep ) or in places that would be later covered by larger pieces (such as the grill on the forearm). For more of an idea about how it was done, I'd suggest reading up on the Amethyst Angel tutorial. The main variation between my version and hers is that mine was finished by coating the foam in layers of PVA, before moving on to give it multiple coats of spray applied Plastidip and finishing it with coats of silver spray paint.


On the whole, I'd say the process is a relatively simple one, the biggest annoyances were in the labour intensive parts (mainly the fingers) or in the actual manipulaton of the materials ( the shoulder covering pieces, despite extended periods of being held into shape only hold a vague version of the curve I'd like them to.


On the whole, for a second attempt with new materials, I'd say it's not bad, it probably looks better in these pictures then it does in real life, but I'm beginning to realise that good photography is part of the art of good prop and costume production. Besides, I'm about to undo all my good work in your minds eye as we look at what we've learned from making it.


First up: Pores
Now this is probably one of my biggest gripes with regards to plastazote foam. Due to it's nature as a foam it is an incredibly porous material and as such it'll drink paint up like there's no tomorrow. Unprimed plastazote is next to impossible to paint without destroying your paint reserves. The piece pictured above ( in fact, the whole set ) was given multiple coatings of PVA glue, plastidip and paint and as you can see, up close the pores are still visible. I applied the PVA with a brush, but I've been told that a better technique is to actually work the PVA in with your fingers, a much more labour intensive task and considering how long the brush application took, I think if I'm to use Plastazote again an alternative coating method may need investigating.

It all comes undone where it all comes together.
Secondly, as I'm sure you can see I made an absolute hash on the joins between layers. This isn't too much of a crisis since when the arm is being worn no one will be able to see these joins unless they're getting way too up in your grill but it's still not very nice at all. fortunately the top grill-piece overhangs the edges to hde them, but a solution isn't obvious.

One idea may be cutting another piece of foam to lay over the mutliple layers, but the extra 'bulk' that would add could become problematic and take away from the design. I can't imagine any sort of tape would serve well either without being as equally conspicuous.

The dangers of an overenthusiastic glue-gun
Now, this is more of a problem on my side, than anything else and hopefully one that can be overcome by practice and technique. The large gash you can see in the centre there is where I peeled away a large wad of hot glue that had settled on the foam. Hot glue is great for joining foam, but the downside it that it's next to impossible to remove when applied accidentally.

As well as that, if you look at the edge between the covering plate and the main body off the arm you can see lots of nasty bits of glue poking out. This is the result of using to much glue to stick pieces down so it leaks out along the edges. As I mentioned it's impossible to remove without damaging the foam and seems far too rubbery in nature to be remove cleanly by sanding.

Plastidip excess
Another problem encountered here caused by a mix of overenthusiam and a lack of familiarity with the materials is that plasti-dip, much like regular spray paint, needs to be applied in many, extremely thin coats fot the best effect. it also pools in valley joins and will run, causing these marks.


And finally we have this. I'm not entirely sure what caused this but I've got the suspicion that it came about by using too much spray paint in one coat, causing the excess to run or spraying a foam piece that was still moist from the previous stages.

So, in summary, what have we learned?

  1. Thin plastazote foam is surprisingly difficult to cut with a craft knife and I don't know what I insist on doing so, scissors seem to produce a better curve, but once you got a rought edge the only option is to keep cutting it down as sanding thin Plastazote isn't a realistic option
  2. Thin coats of both paint and plastidip given more than sufficient time to dry. Avoid causing excess to run resulting in either pocks, trickle marks or discolouration
  3. Easy on the glue, ensure a thin, even spread.
  4. Plastazote does not care how many times you coat it. Either I should go for more coatings of plastidip, find another material to work with or find a more effective method of coating it.
  5. Patience. Patience.
All in all, it's not a terrible piece, it'd be more than passable at a convention and as my first time I'm not to hung up about its flaws, it could definately be better, but there's definately worse.